
ONNX Runtime on Azure ML: Setup Guide
You can serve an ONNX model on Azure ML in a few clear steps: test it locally, package the model and helper files, build a scoring script, pick CPU or GPU compute, deploy a managed online endpoint, and compare cloud output with your local result.
If I wanted the short version, it would be this:
- I first test the
.onnxfile with ONNX Runtime on my machine. - I make sure support files like tokenizers and label maps are in the same package.
- I set up
score.pyand an environment withonnxruntimeoronnxruntime-gpu. - I deploy to an Azure ML managed online endpoint.
- I check logs if the deployment gets stuck in "Transitioning" or turns "Unhealthy."
- I compare shape, dtype, and value range between local and endpoint output.
- If I use a GPU VM, I confirm quota, CUDA support, and the right execution provider.
A few numbers matter right away. A cold start can take 1–2 minutes on the first request. Some GPU VM families start with 0 vCPU quota, so deployment can fail before the model even loads. And one GPU VM like NC4as T4 v3 uses 4 vCPUs, which affects quota planning.
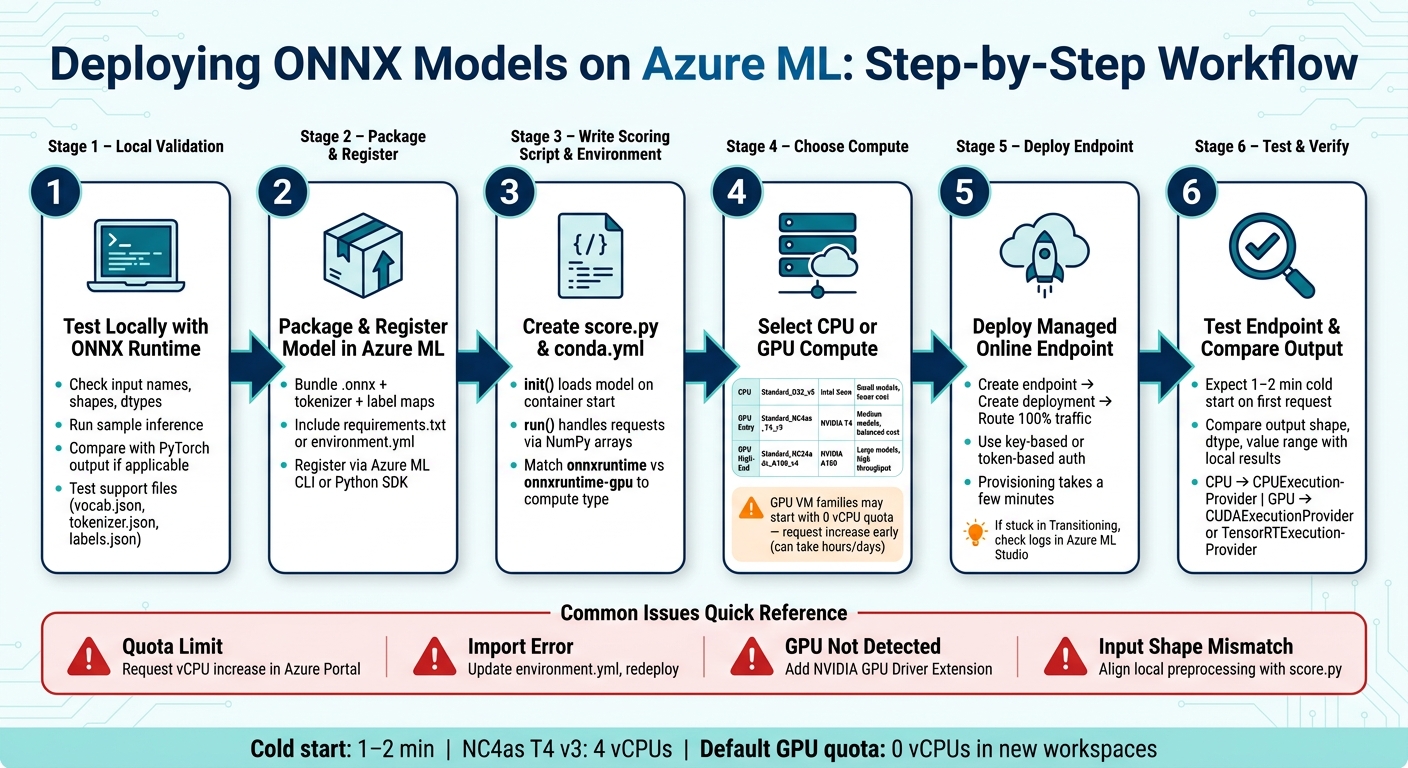
ONNX Runtime on Azure ML: End-to-End Deployment Workflow
MLOPS: Inference onnx Model in Azure ML Managed EndPoint AKS #machinelearning #datascience
sbb-itb-903b5f2
Quick comparison
| Area | What I check first | Common failure |
|---|---|---|
| Local model test | Input names, shapes, dtypes, sample output | Shape or opset mismatch |
| Environment | Python version, onnxruntime package, NumPy |
Import error |
| CPU deployment | CPUExecutionProvider |
Wrong package or config |
| GPU deployment | CUDAExecutionProvider or TensorRTExecutionProvider |
No quota, CUDA/driver issue |
| Endpoint test | Output shape, dtype, value range | Preprocessing mismatch |
Bottom line: if I validate the model locally and keep the Azure environment matched to that local setup, I cut down most deployment issues before they happen.
2. Prepare and upload your ONNX model
2.1 Prerequisites for local and Azure environments
Before you touch Azure resources, make sure your local setup is ready. You’ll need Python 3.9 or later - many teams use Conda or pyenv for that - plus the Azure CLI installed and signed in with az login. You also need an active Azure subscription and an Azure ML workspace.
It’s smart to check GPU quota early. In new workspaces, the default vCPU quota for GPU-focused VM families like NCas_T4_v3 is often 0, which means you may have to request more quota in the Azure portal before you can deploy a GPU instance. That approval can take hours or even days, so don’t leave it until the last minute. This quota decides whether a GPU-backed endpoint is even an option later.
Once quota and local dependencies are in place, test the model on your machine before you upload anything.
2.2 Validate the model with a local ONNX Runtime test
Install onnxruntime or onnxruntime-gpu, then load the model into an InferenceSession. From there, check the input and output names, shapes, and dtypes, and run a sample inference. That one small forward pass can save a lot of pain by catching opset mismatches or shape issues before deployment.
If the model came from PyTorch, compare the ONNX output with the PyTorch output before upload. That side-by-side check is a good sanity test.
If your model needs extra files, test those at the same time. Common examples include:
vocab.jsontokenizer.jsonlabels.json
Run them with the model in the same local test so you know the full bundle works together.
After the local test passes, you’re ready to register the model and its supporting files in Azure ML.
2.3 Register the model and related files in Azure ML
Once local validation is done, register the model with the Azure ML CLI or Python SDK. Add the .onnx file together with tokenizer, label, and preprocessing assets in the same model package.
You should also include a requirements.txt or environment.yml in that package. That way, all runtime-critical files move with the registered model and are ready when you create the endpoint.
3. Create a managed online endpoint with ONNX Runtime
3.1 Write the scoring script and define the environment
After you register the model and support files, the next step is to set up what Azure ML will use at inference time. You need two deployment files: score.py and an environment definition.
score.py uses a simple two-function pattern. init() loads the ONNX model when the container starts. Then run() handles each request, turns inputs into NumPy arrays, runs inference, and sends back JSON.
Your environment file - usually conda.yml - needs to match the compute you plan to use. Include onnxruntime for CPU deployments or onnxruntime-gpu for GPU deployments, plus numpy and azureml-inference-server-http. If a package is missing, the deployment will often sit in "Transitioning" instead of starting cleanly.
Once the environment lines up with the runtime, pick the compute that fits the job.
3.2 Choose compute and check runtime support
For smaller models or workloads that don't need the lowest possible latency, CPU-focused VMs in the Dv5 series are often a solid choice. For example, Standard_D32_v5 comes with 32 vCPUs, 128 GiB of memory, and 3rd Generation Intel Xeon Scalable Processors.
If you need to serve larger models or handle more inference traffic, move to an NC-series GPU VM. Two common examples are Standard_NC4as_T4_v3, which includes an NVIDIA T4 GPU, and Standard_NC24ads_A100_v4, which includes an NVIDIA A100 GPU.
| Compute Type | Example VM | Hardware | Best For |
|---|---|---|---|
| CPU | Standard_D32_v5 |
Intel Xeon Scalable Processors | Small models, lower cost |
| GPU (Entry) | Standard_NC4as_T4_v3 |
NVIDIA T4 | Medium models, balanced cost/performance |
| GPU (High-End) | Standard_NC24ads_A100_v4 |
NVIDIA A100 | Large models, high throughput |
One detail matters a lot here: the onnxruntime package has to match the VM type. Use the CPU build for CPU deployments, and use onnxruntime-gpu for NC-series GPU VMs. If you're building a custom GPU environment, the NVIDIA GPU Driver Extension can handle driver installation for you.
After the runtime and VM line up, you're ready to deploy the endpoint.
3.3 Deploy the endpoint and wait for provisioning
Deploy the same registered model package you already tested locally. In practice, endpoint setup breaks into three actions:
- Create the managed online endpoint
- Create the deployment that ties together the model, scoring script, environment, instance count, and VM size
- Send 100% of traffic to the new deployment
You can use either key-based or token-based authentication.
Provisioning usually takes a few minutes, so some waiting is normal. If the deployment stays in "Transitioning" longer than it should, check the logs in Azure ML Studio or through the CLI. Those logs usually point straight to the issue, which makes it much easier to fix deployment errors before you test the endpoint.
4. Test the endpoint and verify runtime behavior
4.1 Send a test request from Azure ML Studio or Python
Once provisioning is done, grab the endpoint URL and auth key for your managed online endpoint. From there, you can send a test request in Azure ML Studio or use Python if you want a repeatable setup.
Plan for a cold start. On the first request, the server may need 1–2 minutes to wake up and load the model into memory. That delay is normal. After the endpoint responds, check the output against your local test.
4.2 Compare endpoint output with local ONNX Runtime results
After the first request works, compare the endpoint output with your local ONNX Runtime result. Start with the raw output from both sides, before any postprocessing. Focus on three things:
- Output shape
- Data type
- Value range
Those should line up between the local run and the cloud result.
If they don’t, check that tokenization and any sampling steps are exactly the same in both places. In many cases, shape or precision mismatches point to an environment mismatch, not a bad model.
4.3 CPU vs. GPU runtime options at a glance
Use the mapping below to confirm the deployment is running on the execution provider you expect. In Azure ML, CPU serving uses CPUExecutionProvider on standard D/F-series VMs. GPU serving uses CUDAExecutionProvider or TensorRTExecutionProvider on NC-series VMs with the NVIDIA GPU Driver Extension installed.
| Serving Mode | Execution Provider |
|---|---|
| CPU | CPUExecutionProvider |
| GPU | CUDAExecutionProvider / TensorRTExecutionProvider |
5. Fix common setup issues and review the workflow
5.1 Dependency, CUDA, and environment mismatches
If deployment finishes but the endpoint still shows as unhealthy, start with the container environment.
Most of the time, an unhealthy endpoint means environment.yml is missing something the app needs. Check the logs for ModuleNotFoundError or ImportError, then update the YAML file and redeploy.
For GPU deployments, make sure the NVIDIA GPU Driver Extension is installed. If Trusted launch gets in the way and blocks driver setup, recreate the VM with Standard security instead.
It also helps to pin the same Python version both locally and in Azure with pyenv. For example, use 3.10.13 in both places.
5.2 Model input, opset, and scoring errors
If the container starts cleanly but inference breaks, the next place to look is the model export and scoring path.
When inference fails after startup, check the model input settings and opset first. One easy detail to miss: Azure quotas are measured in vCPUs, not instance count. So a single NC4as T4 v3 VM uses 4 vCPUs, and many GPU families start with a quota of 0.
Request the increase in Azure Portal > Quotas before deployment.
5.3 Key takeaways from setup to testing
Use this table to match the failure to the fastest fix.
| Issue | Symptom | Fix |
|---|---|---|
| Quota limit | Deployment stuck in "Transitioning" | Request a vCPU quota increase in Azure Portal > Quotas |
| GPU not detected | Runtime falls back to CPU or throws CUDA error |
Add the NVIDIA GPU Driver Extension |
| Import error | Endpoint status is "Unhealthy" | Check logs for ModuleNotFoundError, update environment.yml, redeploy |
| Driver conflict | Driver installation fails | Recreate the VM with Standard security type |
| Opset error | Unsupported Opset version during inference |
Re-export at a lower opset or upgrade onnxruntime in Azure |
| Input shape mismatch | ONNXRuntimeError on the first request |
Local preprocessing does not match the scoring script |
FAQs
Do I need to register tokenizer and label files with the ONNX model?
No. You do not need to register tokenizer and label files as part of the ONNX model itself.
The ONNX model contains the computational graph and learned parameters. Your application code should handle input tokenization and label mapping separately, so data is formatted correctly before inference and interpreted correctly afterward.
How do I know if my Azure ML endpoint is using CPU or GPU runtime?
Check the execution providers in your ONNX Runtime session. In your code, active providers like CUDAExecutionProvider mean the model is running on the GPU. CPUExecutionProvider means it’s running on the CPU.
If you need hardware-specific performance, set the providers directly when you initialize the session. That removes guesswork and makes the runtime behavior clear.
You can also check Azure endpoint performance metrics to confirm which resources the endpoint is using.
What should I check first if local and endpoint outputs do not match?
Start by checking the model inputs and outputs with sample data. Make sure the data types, tensor shapes, and numeric results line up between your local model and the endpoint.
Then dig into common trouble spots. A lot of deployment issues come down to things like:
- Input format mismatches
- Unsupported operators
- Memory allocation errors
If the numbers still don’t match, compare weight and activation tensors with ONNX Runtime’s qdq_loss_debug. That can help you pinpoint the exact layers or nodes where things start to drift.